
7 min read
Google Form to Calendar: Create Events Automatically
Connect Google Forms to Google Calendar with Form2Cal. Map dates, times and guests, test your setup, and create events automatically from responses.
See the workflow before you build it
The video shows the exact sequence behind this guide: a Google Form response, the created Google Calendar event, and the Form2Cal setup that keeps the workflow running.
Turn a form submission into a calendar event
You can turn a Google Form submission into a Google Calendar event with Form2Cal. Choose the destination calendar, match your form questions to event fields, and save the configuration. Future submissions can create events automatically, including the date, time, location and guest information.
This is useful when you already collect event details through Google Forms and want to stop copying those answers into Calendar. This guide walks through the setup and the checks to make before sharing your form.
1. Create separate date and time questions
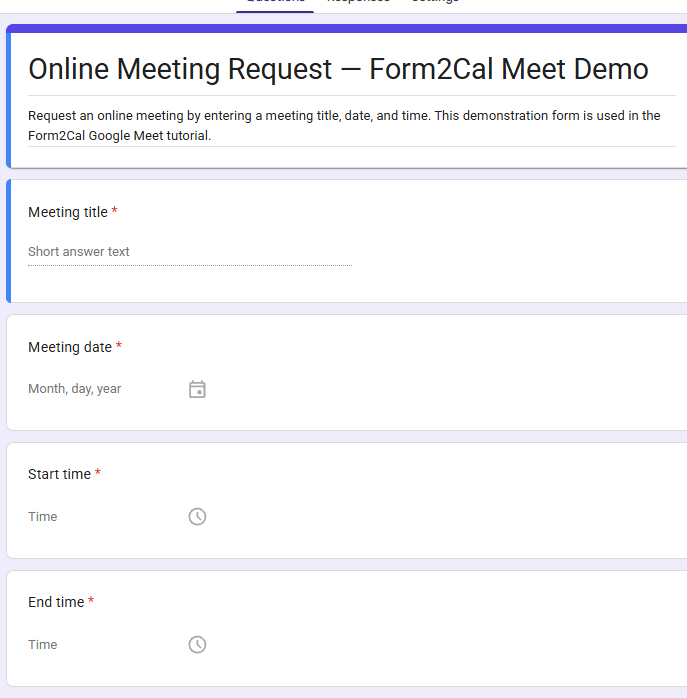
Start with the information you need on the calendar event. Use the Date question type for the event date and Time questions for the start and end times. Separate fields are easier to map than a text answer such as ‘next Tuesday afternoon.’
Make the event date required. For timed requests, make the start time required too. A fictional training request could contain the title New staff orientation, a date of November 12, 2026, a start time of 10:00 AM and an end time of 11:00 AM.
- Event name: a short title for the calendar event.
- Event date, start time and end time: separate questions for each value.
- Email address: collect this if someone should receive an invitation.
- Location and notes: include the context people need before attending.
2. Open Form2Cal and choose the destination calendar
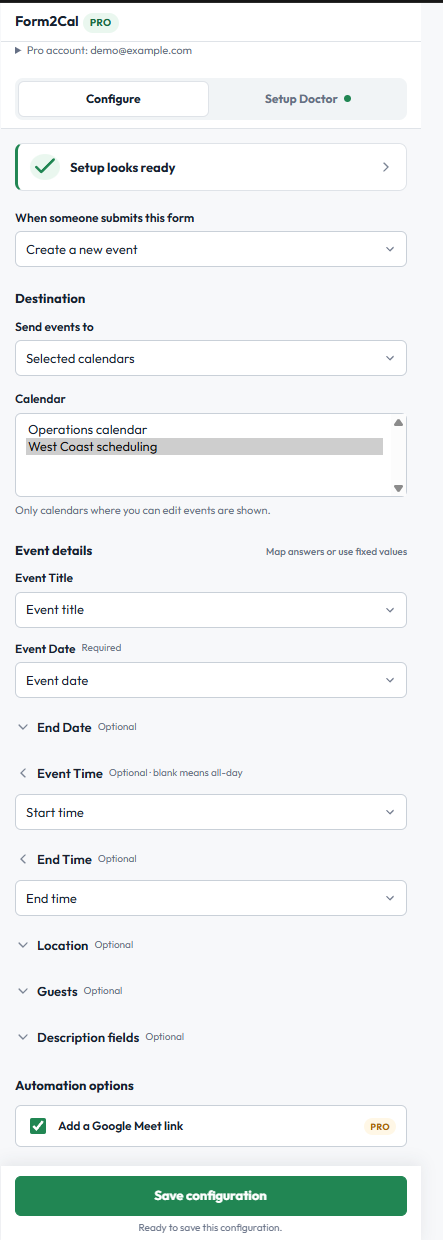
Install Form2Cal, then open it from your Google Form’s add-ons menu. Under When someone submits this form, choose Create a new event. Under Send events to, choose Selected calendars and select the destination.
The configuring account needs permission to create events on that calendar. For an initial test, choose a calendar you can easily inspect. Free supports one form workflow and one selected calendar. Pro adds multiple destination calendars, answer-based routing and Google Meet links.
3. Match form answers to calendar fields
Map Event Title to your event-name question, Event Date to the date question, Event Time to the start-time question and End Time to the end-time question. Expand the optional fields to map Location, Guests and Description fields.
Use a fixed value when every event should share the same detail, such as a room name. Leaving Event Time blank creates an all-day event. For timed events, omitting End Time uses a default one-hour duration. Map End Date as well when the event crosses into another day.
4. Decide whether to invite the respondent
Creating an event and inviting someone are separate choices. To invite the person submitting the form, map Guests to Respondent’s Email or to a question containing their email address. Turning on Collect email addresses in Google Forms makes the respondent-email option more reliable.
For internal requests that need review first, leave Guests blank. Review the event and invite the requester afterward. For virtual events, Form2Cal Pro can add a Google Meet link.
5. Preview the event with Setup Doctor
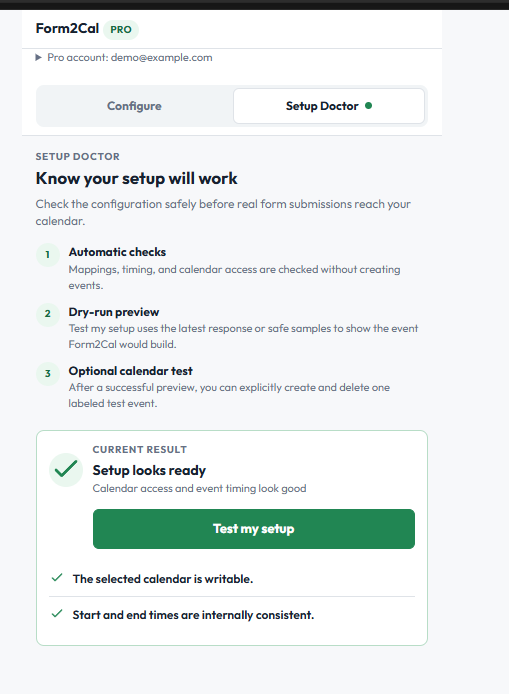
Open Setup Doctor and select Test my setup. The dry-run preview shows the event Form2Cal would build using the latest response or sample values. It does not create a calendar event.
Check the destination, title, date, start and end times, and guests. Fix blocking errors before saving. When the preview looks correct, click Save configuration. If the preview uses sample values, still test a real form submission afterward.
6. Submit the form and check the actual event
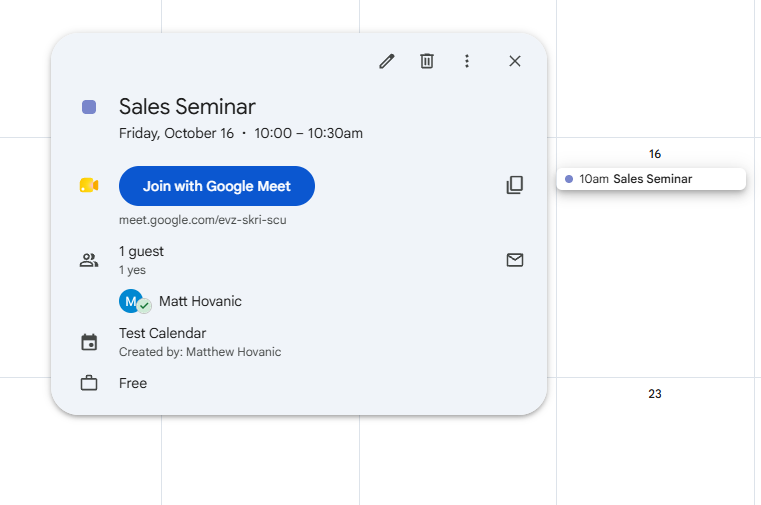
Open the respondent version of the form and submit fictional details using an email address you control. Then open the destination calendar. Verify the date, start and end times, title, location, notes and guest list. If Meet is enabled, check that its link appears.
This final check verifies the complete path from a real submission to Calendar. The example below illustrates the resulting event view; it is a separate demonstration from the sample configuration above.
What if the calendar event does not appear?
Start with Setup Doctor. Check that the Event Date question contains an answer and appears on every relevant form path. Confirm the destination calendar and the configuring account’s edit access.
If an event becomes all-day, check the Event Time mapping and submitted answer. If guests cause an error, check that the mapped value contains valid email addresses. Form2Cal creates events from submitted details; it does not check availability or prevent overlapping requests.
Frequently asked questions
Can I connect Google Forms to Google Calendar without a script?
Yes. Form2Cal provides field mapping and setup checks inside Google Forms, so you can configure the workflow without writing your own Apps Script.
Can Form2Cal create all-day and multi-day events?
Yes. Leave Event Time blank for an all-day event. Map End Date when an event spans multiple days, and check the preview before saving.
Can different form answers send events to different calendars?
Yes, with Pro answer-based routing. A dropdown or multiple-choice answer can determine the destination calendar for each submission.
Does Form2Cal prevent double bookings?
No. It creates calendar events from submitted details. It does not check live availability or prevent two people from requesting the same time.
Form2Cal
Put this workflow to work
Start from the product page for setup details, or install the add-on from the Google Workspace Marketplace.